Showing posts with label Handmade 2010. Show all posts

12/11/10

365 - Peace

Day 11


I spent the day at my friend Michelle's house finishing up my Christmas banner.  I am very pleased with the result!  I am also pleased that I can check off one more thing on my DayZero list.  I have been wanting to make a banner for a long time, and now that I have one complete and realize how simple it is, I'm ready to make some more.

The kids helped me out with this and they are so happy to see it complete and hanging in our living room.  It is going to be one of those decorations I look forward to putting up every year!  I have all the materials cut and prepped to make another one, I just haven't decided who to make it for...

11/18/10

Striped Mittens

Here they are, to match this hat.  Cameron's striped mittens in worsted weight Malabrigo Coco, Cinnabar and Rhodesian.  The pattern is the same KPS pattern as the hat.  I know I said this before, but if you do not already have a hat and mitten pattern that you love, if you are new to knitting and haven't knit a hat or mittens yet, or if you just don't know what pattern to choose, the Hat amd Mitten Set for Children #253 is the one to get!

11/17/10

Lady Bug Bag Tutorial

I haven't used my sewing machine in a really long time.  I'm talking about 5 months!  When my niece asked for books for her birthday my Mom and I thought a perfect compliment to the gift would be a handmade bookbag!  I did not use a pattern for this bag, I just made it up as I went along using my former bag making experiences as a guide. Using fabric already on hand with this particular niece in mind, here is what I did.

First, cut out all your fabric pieces.  For most bags I make I use two or three coordinating fabrics.  Fabric A is the outer bag and Fabric B is the inner lining of the bag.  Fabric B is also used for the outside pocket.  If you would like an inside pocket, you would use Fabric A for that.
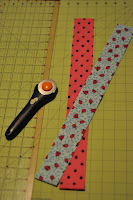
Cut two 2" x 38" handle pieces, one of Fabric A and one of Fabric B
Cut two 6" x 9" pocket pieces from Fabric B
Cut two 13" x 15" bag pieces on the fold of the fabric so that your pieces are actually 13" x 30" with the fold on the bottom 13".  Cut one from Fabric A and one from Fabric B (photo not shown)


Start by sewing the pocket.  Sew all four sides together with a 1/2" seam with the right sides facing in.  Leave a small opening on one side to pull the fabric through.  Pull the fabric through and press the pocket flat with an iron.  Leave the opening unstitched.

Pin the pocket to the right side of the outer bag piece, Fabric A.  The fold of the fabric is the bottom of the bag.  Place the pocket in the center allowing for 1/2 inch seams around the edges.  Place the pocket with your unsewn opening at the bottom.  When you stitch the pocket you will also stitch the opening.

Sew a 1/4" seam around three sides of the pocket, leaving the top open.


Sew the main bag by sewing a 1/2" seam down the two sides leaving the top of the bag open.  The bottom of the bag is the fold and does not need to be sewn.


To make a bag with a gusset, fold open one corner of the bag so that the side seam is in the middle creating a point.  Measure two inches up both sides and mark with a pen.  With a straight edge, connect the two marks by drawing a line across the fabric.  Sew across the line. 


Cut excess fabric.  Repeat for the other corner.


Repeat the above steps for the inner lining, Fabric B excluding the steps for the pocket.

Next, create your handles by sewing a 1/4" seam down the length of the fabric with the right sides of the fabric A and B facing each other.  Press the seam.  Fold the outer edges to the center and press. 


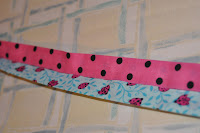
Fold the handle piece in half and press again.  You will have one 38" piece with Fabric A on one side and Fabric B on the other.  Sew along both edges as shown.  About a 1/8" seam.


Cut the piece in half.  You will have two 19" identical handle pieces.


Pin the handles as shown and sew into place on both sides of the bag.  Place your lining inside your main bag with the right sides facing each other.  Be sure that the handles are inside the bag.  Sew around the top edge of the bag with a 1/2" seam.  Leave a 1 1/2 to 2" opening to pull the fabric through.


Pull the bag through the opening so it is right side out.


With the lining inside the bag, press the top of the bag and sew a 1/4" seam around the top of the bag.  You will sew over the handles again, making them more secure.  You will also sew shut your pull through opening.


And that's it!  You are done!  I am planning on making more of these.  They are great for library books, ballet clothes and shoes, sports clothes and shoes, all you have to do is change up the fabric to fit the activity!

11/15/10

Hats for Winter


After I finished my sweater, I quickly cast on for Cameron's new winter hat.  For his hat I used Malabrigo yarn which I ordered from Kaleidescope Yarns in Vermont.  If you have never used this yarn, belive me when I say it is the softest yarn I have ever knit with.  My little Cam has very sensitive skin so this yarn is perfect for him.  I chose to knit a three-color striped hat in Coco, Cinnabar and Rhodesian this year and I love the way it turned out!  The pattern is my old stand-by from Knitting Pure and Simple in a rolled edge.


There was a time when a simple hat took me a good couple of weeks to finish.  This hat only took me two days!  My darling husband remarked to me the other day, "I really thought when you started knitting it would just be a passing phase.  I didn't think you would stick with it."  I don't think he knows me very well!  When I take up a task, no matter what it is, I conquer it!  With knitting, I just fell in love.


As soon as Cam's hat was finished I immediately cast on for Olivia's hat.  For her hat I used a self-striping yarn from Noro in pinks and purples.  This hat only took me one day!  I used the same pattern only with a ribbed edge.  The KPS pattern is great because it gives three slightly different styles and if you change up your yarn selections you come out with a huge variety of hats! 

Now on the needles:  Cameron's matching mittens.  Stay tuned!

11/13/10

FO - February Lady Sweater!!!!


Two days ago I finally did it.  I bound off the last stitch of my February Lady Sweater.  This sweater was over a year in the making.  If you are a reader of my blog you may remember the day I had to rip out the whole body of the sweater because I made it two sizes too large.  After that sad day I was determined to finish the sweater in time for winter and I did it!  I am very happy with the end result.  You might see a lot of this sweater this winter because I am in love with it!


You also may have noticed there are not a whole lot of photos of me on this blog.  I am the camera person in the family.  My husband just isn't into it, which is fine, but makes it seem like I don't exist in family photo albums.  When I asked him to photograph me in my sweater for the blog he was happy to do it.  The kids thought it was so strange that I was having my picture taken.  They kept running over to get in the picture.  It took some time to get the first photo, but we had a fun 30-minute photo shoot.


10/8/10

FO- Cameron's 2010 Sweater

It's finished!  Cameron's KPS hooded tunic.  I captured these adorable shots of him playing an archery game on our new Wii.  Yes, we have entered the gaming world, much to my dismay, but Cameron enjoys it and adheres to the limits we set.  Personally, I only wanted it for Netflix streaming, but the Wii Sports Resort game is actually pretty fun!  Plus, I'm better at it than Damien, so there is that.

Here he is in his sweater.  He wouldn't take it off!
I love that he looks like a little woodsman, it makes me smile :)
Oh, by the way, the archery game shoots at targets not at animals, in case you were wondering ;)


As we were snuggling in bed the first night it was finished, Cameron whispered in my ear, "Mommy, can I wear my sweater to school tomorrow?"  He sure knows the right words to say to make his Mama happy!

2/3/10

W.I.P. Wednesday #12

My WIP posts are usually up pretty early in the morning on Wednesdays, but today I was a little delayed.  I wanted to complete last week's WIP before posting a new one.  Olivia's fingerless mittens are done.  They are so cute on her darling little hands, but I want to wait until Daddy comes home to take a picture.  I have a fantastic photo in mind, but I need his help.  But here are both of my kids fingerless mitts (minus their cute little hands) along with this week's WIP:


After completing the fingerless mittens I cast on this pretty Mission Falls 100% merino superwash wool.  It's a plum color and it will become the Odessa hat by Grumperina for my dear friend Renee.  As requested I will be leaving out the beads on this hat.  This should be a nice quick knit as it is the second time I have knit this hat.  Check out my Handmades page to see what I have knit this year and to check out what is "on deck" for the coming weeks!  At some point I would like to try the Odessa hat again with beads.  Maybe for myself?

1/27/10

W.I.P. Wednesday #11

Remember these?  If you do, then you remember that my whole family wanted me to knit them a pair.  Cameron's are finished!


Olivia's are on the needles!

1/17/10

Bunny Family

This sweet little family of bunnies has taken up residency at Charlotte's house, my niece who just turned two yesterday.  I know that Charlotte will take good care of them and give them the love that they deserve!


Cameron and Olivia were very excited about the creation process of these bunnies.  These bunnies are very special as they were created using yarn given to me by a friend from work.  She found this yarn for free at a swap shop, and knowing how much I love to knit, she grabbed it up for me along with about 30 other balls of thrifted yarn.

Each time a bunny was finished the kids would snatch it up and start playing with it immediately.  The last two bunnies were created with help from both kids.  Olivia helped stuff the bunnies and Cameron helped to make the tails.  Of course, as with all things that the kids see me create, they would both like a bunny family of their very own.  I will honor their request as soon as I am finished making their fingerless mittens :)

On the morning of Charlotte's birthday party, the kids could not wait to package up the bunny family and give it to the birthday girl.  We used a shoe box we had saved and a paper shopping bag from our stash.  Cameron stamped little animals on the paper and the frugal gift was wrapped in the most frugal way!  Cameron, my sweet and generous big boy, wondered out loud where Cole's gift was.  I tried to explain that it was Charlotte's birthday and that we would make a gift for Cole this summer, but Cameron would not accept that.  He went into his play room and found two cars.  Then, he had Olivia stamp a gift bag and bingo! a gift for Cole.

The two excited little kiddos paused for a photo before we got in the car for the "loooooooong" (Cameron's words) drive to Cole and Charlotte's house.

I love these kids!!!!

1/8/10

FO Friday

Finally, fingerless mittens for me.  I absolutely love them!!!  No more freezing hands in my house.  It also pleases me that my entire family wants me to knit them a pair now, and I am very happy to oblige.

Photo by Cameron- age 5.

1/4/10

First 2010 Knits

Now that Christmas is done, I thought I would take a break from knitting for a little while, but I can't stop. Knitting is so comforting to me.

Here are the two hats that were not pictured in my last post and technically knitted in 2010!